
When it comes to optimizing your website, the role of caching in WordPress can never be underestimated. What exactly is caching all about? We know that it can speed up our websites, but is there more to it?
Table of contents
What is Caching?
Caching is the process of creating static versions of your content and serving that to visitors. Static pages are generally rendered quickly in browsers. This leads to the faster performance of your website.
Here is the list of best cache plugins for WordPress that you may wanna use.
This way, the back and forth queries to and from the database can be avoided, reducing the server load.
Advantages of Caching
- Enhances the speed and performance of your website
- Help reduce the load on your hosting server
- Save server memory and I/O operations
- Offers a better user experience
The easiest way to do so is by using plugins. Several free and premium WordPress plugins help you enable caching on your website.

In this article, I will particularly talk about the WP-Rocket plugin.
WP-Rocket
Developed by Jonathan Buttigieg and Jean-Baptiste Marchand-Arvier, WP-Rocket is a premium caching plugin that delivers the best results out of all WordPress caching tools on the market.
It is generally considered one of the top caching plugins for WordPress, yet it is 100% premium. The plugin caches in the background via wp-cron to reduce the load. However, WP-Cron is a plugin that allows taking control over the execution of cron jobs.
It works by stimulating the current user’s session cookies when requesting a page to the cache. In addition to better performance levels, it includes a better and easier-to-use settings area.
How to install WP-Rocket?
- First of all, buy WP-Rocket plugin and download it.
- To install the plugin through your WordPress dashboard, you need to start with the plugin’s zip file.
- Download the zip file normally and proceed with the installation.
- Go to WordPress admin panel >> Plugin >> Add New >> Upload Plugin.
- Upload the zip file.
Once it’s activated, go to the settings panel. You will receive an automatic email telling you a new website has been added to your account.
How to configure WP-Rocket?
Activate the plugin.
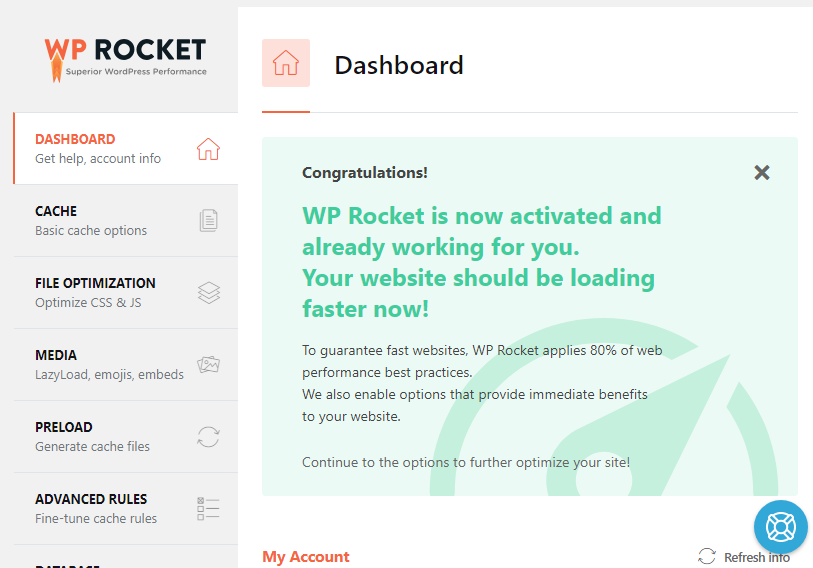
According to WP Rocket team, your site speed gets improved after only enabling it. So, primarily check whether that your site is improved.
However, there are many settings you can configure to suit your site. To do so,
- Open the plugin panel, click WP Rocket. It will ask for the following things, and you need to check the checkbox.
Dashboard
In the Dashboard, you can see sections like My Account, My status, etc.
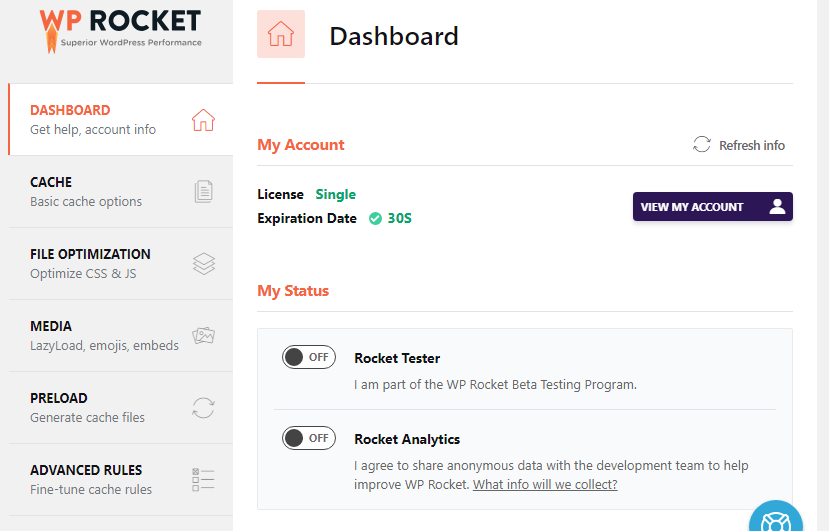
My status section:
- If you are a beta tester, turn ON the Rocket tester.
- If you want to share anonymous data with the development team, you can turn on Rocket Analytics.
Click on Save changes.
Cache
This section involves basic caching options like Mobile cache, User cache, Cache lifespan.
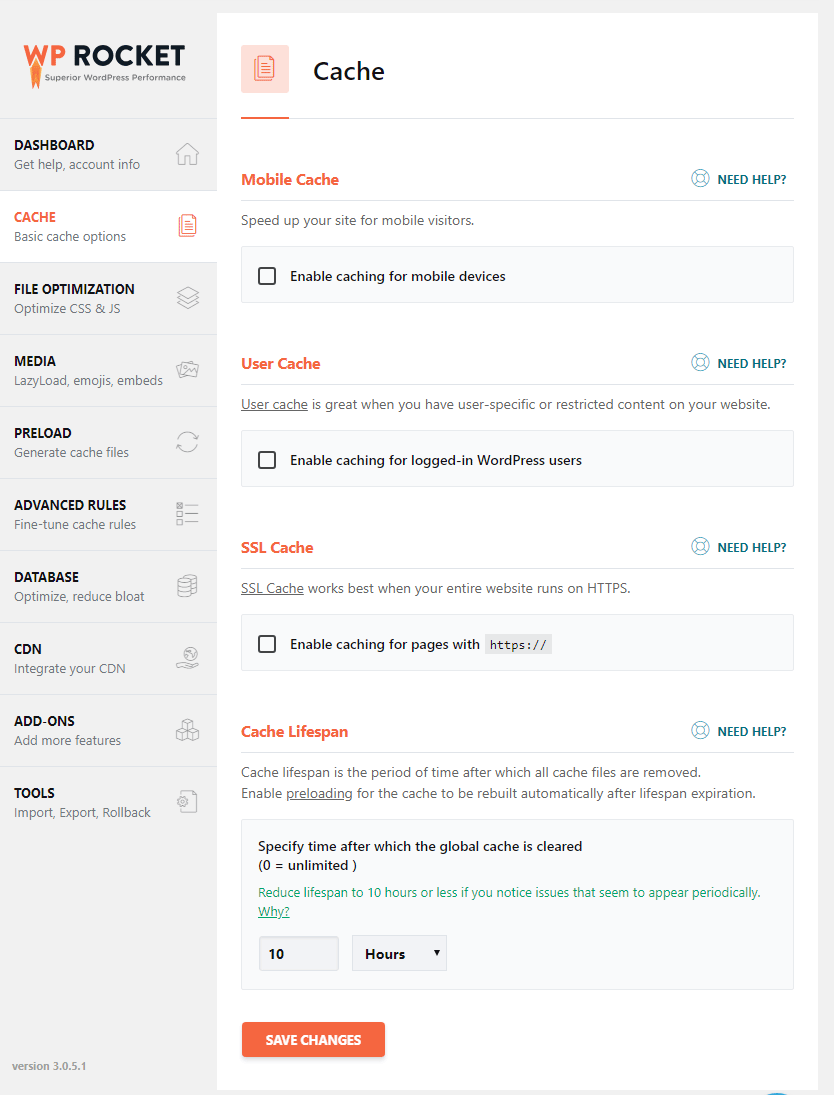
Mobile Cache
- If you are using the mobile theme for your site or blog, it is recommended to enable the mobile cache. It is also recommended that you do not enable mobile cache if your website is not responsive.
- If you have a separate mobile theme on your site, then turn on the separate mobile cache.
Logged In User Cache
Enable caching for logged in users if you have users who log in to access your site. If there are multiple users on your site, it will offer individual cache to those.
Cache Lifespan
Set the cache lifespan according to your convenience. I recommend keeping it 24 hours by default as the cache files will be removed automatically after 24 hours.
Note: Setting this too low will clear the cache too frequently. On the other hand, setting it too high might cause visitors to miss the latest content on your site. But if you want an unlimited lifetime, set it as 0, and cache files will remain as it is.
Click on Save changes.
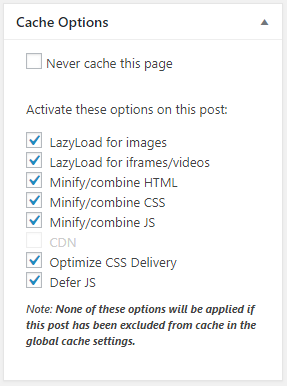
Note: You can completely disable or manage cache for individual pages or posts on your editor screen. You can either choose the Never cache this page option, which will completely stop caching that individual page or post, or disable/enable other options.
- LazyLoad for images
- LazyLoad for iframes/videos
- Minify/combine HTML
- Minify/combine CSS
- Minify/combine JS
- CDN
- Optimize CSS Delivery
- Defer JS
File Optimization
It includes the minification of several files such as HTML, CSS, Google Fonts, and JS. I recommend enabling the option only if you have an updated version of HTTP1 (For example, HTTP1.1 or HTTP2).
It reduces the weight of each file and allows faster reading of browsers and search engines.
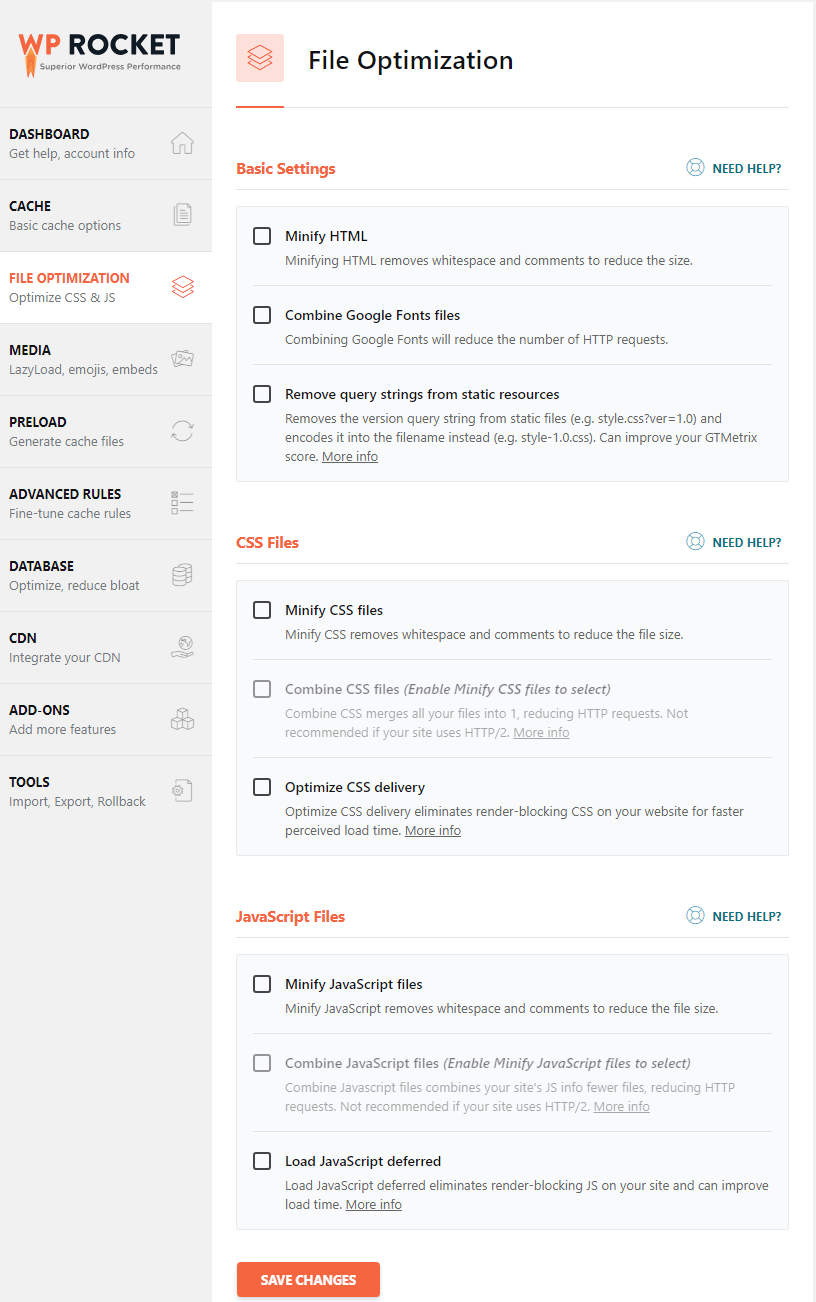
The optimization is categorized into 3 parts:
- Basic settings
- CSS Files
- JavaScript files
Basic Settings
- Minify HTML: Minifying HTML removes whitespace and comments to reduce the size
- Combining Google fonts files: Combining Google Fonts will reduce the number of HTTP requests.
- Remove query strings from static resources: Enabling it removes the version query string from static files (e.g., style.css?ver=1.0) and encodes it into the filename instead (e.g., style-1.0.css).
CSS Files
- Minify CSS: Enabling it removes whitespace and comments to reduce the file size.
- Combining CSS: Combine CSS merges all your files into 1, reducing HTTP requests.
If your site is already on HTTP2, then this option is not recommended.
3. Exclude CSS files: If you want to exclude some specific CSS from a directory, you can enter the path or URL in this option. However, this is optional and not highly recommended.
4. Optimize CSS Delivery: Enabling it eliminates render-blocking CSS on your website for faster-perceived load time.
5. Fallback critical CSS: WP Rocket makes it as convenient as possible to handle advanced performance optimizations like asynchronous CSS and critical CSS.
When you activate the Optimize CSS delivery setting checkbox, critical CSS will be generated for your website in the background and added upon the next page load. After that, CSS will be loaded asynchronously on your site.
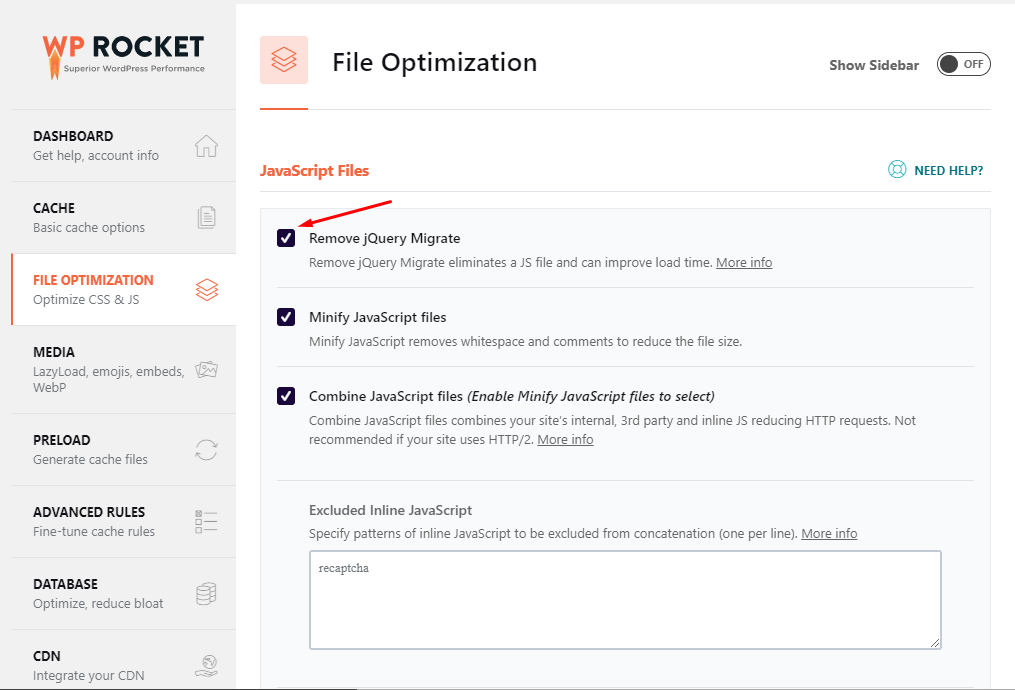
JavaScript Files
- Minify JS Files: Minify JavaScript removes whitespace and comments to reduce the file size.
- Combine JS Files: Once activated, it combines your site’s JS info in fewer files, reducing HTTP requests. Not recommended if your site uses HTTP/2.
- Excluded JS files: If you want to exclude some specific JS from a directory, you can enter the path or URL in this option. However, this is optional and not highly recommended.
- Load JS deferred: Like CSS, enabling it reduces render-blocking JS on your website for faster-perceived load time.
Click on Save changes.
If you are using the latest theme and plugins, then this file is not needed. So it’s a good idea to remove it to reduce unnecessary HTTP requests.
Media
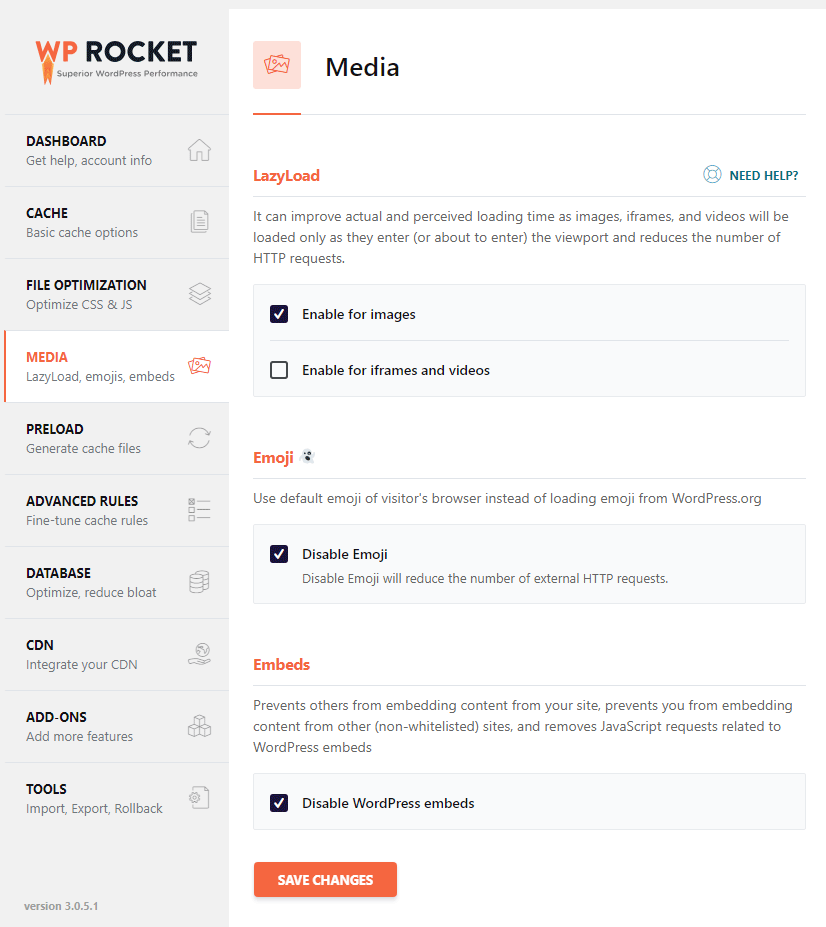
Lazy Load
Enable the lazy loading of images, especially if you have a lot of images on your site. Doing so faster the long page by delaying images. You can also enable it for iFrames and videos. Enabling a lazy load for iFrames will give you the option to replace YouTube embeds with the preview image thumbnail.
Emoji
If you are not using emojis on your website, disabling Emoji will reduce the number of external HTTP requests to your website.
Embeds
Disabling it prevents others from embedding content from your site, prevents you from embedding content from other (non-whitelisted) sites, and removes JavaScript requests related to WordPress embeds.
Click on Save changes.
WebP compatibility
You can use this feature to serve WebP version of the images to your visitors. If you are using Imagify plugin to generate WebP files on your site, you don’t need to make any change.
Preload
It is categorized into 3 sections:
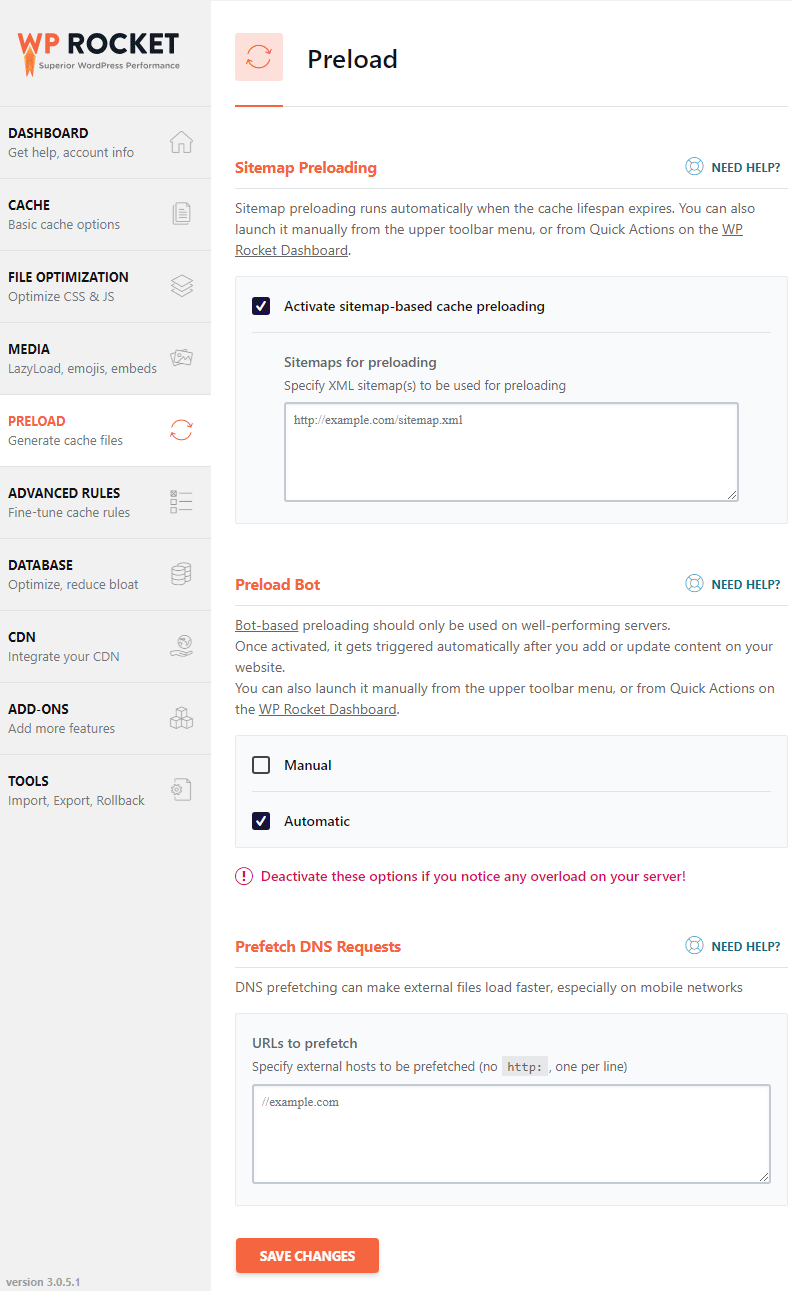
Preload cache
Activating sitemap preloading runs automatically when the cache lifespan expires.
If you are using Yoast SEO, it will detect the sitemap generated by the Yoast SEO plugin.
There is also an option to submit the sitemap manually. Just enter the URL in the sitemaps for the preloading box.
This option is recommended if and only if you have well-performing servers.
Keep it automatic; it gets triggered automatically after you add or update content on your website. You can also launch it manually from the upper toolbar menu when you are on the dashboard or from Quick Actions on the WP Rocket Dashboard.
Prefetch DNS requests
DNS prefetching can make external files load faster, especially on mobile networks. You can also add external hosts to be prefetched. For that purpose, you have to enter the URL in the box.
Some most commonly used domains for DNS Prefetch:
//use.typekit.net
//netdna.bootstrapcdn.com
//s0.wp.com
//s.gravatar.com
//stats.wp.com
//www.google-analytics.com
//cdnjs.cloudflare.com
//ajax.googleapis.com
Preload Fonts
If you have your site fonts hosted on your server, you can preload fonts on your website. Preloading fonts improve the overall performance of your site by helping browsers discover fonts in CSS files.
Database
The database involves different sections to clean up, including Post-cleanup, Comments cleanup, Transients Cleanup, Database Cleanup, and Automatic Cleanup.

- Post Cleanup: Enabling post-cleanup post revisions and drafts will be permanently deleted. Do not use this option if you need to retain revisions or drafts.
- Comments cleanup: Spam and trashed comments will be permanently deleted.
- Transients Cleanup: Transients are temporary options; they are safe to remove. They will be automatically regenerated as your plugins require them.
- Database Cleanup: Reduces overhead of database tables.
Click on Save changes.
RocketCDN
WP Rocket offers a RocketCDN to deliver your content at a speed of light.
To use this option, you need to get a subscription for RocketCDN by clicking on the GET STARTED button. Remember, this feature is not free and available at extra cost.
StackPath powers RocketCDN. The plugins apply the best CDN configuration to boost your website speed and performance grades.

CDN
WP Rocket is generally compatible with most CDN providers, including Amazon CloudFront, MaxCDN, KeyCDN, and others.
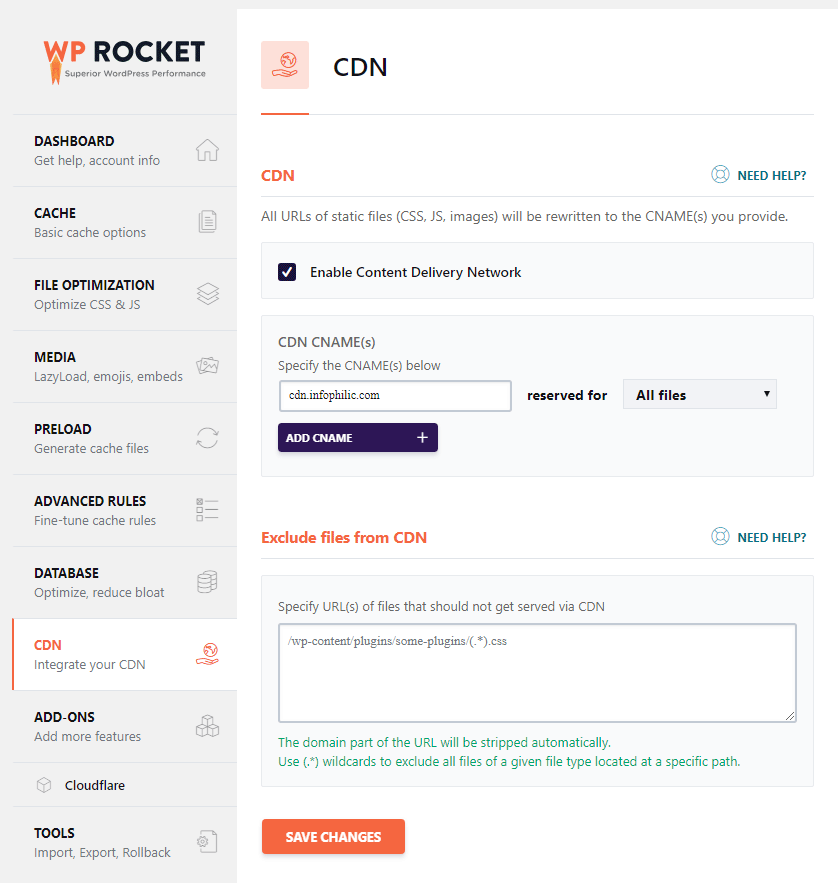
CDN CNAME
- Activate the CDN by clicking on the checkbox.
- Enter the CDN CNAME and choose reserved for all files.
Exclude files from CDN
There are some files, which you may don’t want to serve via CDN. In this case, you can enter the URL of that files or directory in the box. The domain part of the URL will be stripped automatically.
Click on Save changes.
Add-ons
WP Rocket plugin comes with One-click Rocket Add-ons to optimize tracking scripts like Google Analytics and Facebook pixel.
Enabling this feature will host these scripts locally on your server to satisfy the PageSpeed recommendation for Leverage browser caching.
WP-Rocket with Varnish
WP-Rocket is compatible with Varnish. The plugin comes with a one-click add-on that purges all the Varnish cache. Each time WP Rocket purges a cache to make sure all the cache is up to date.
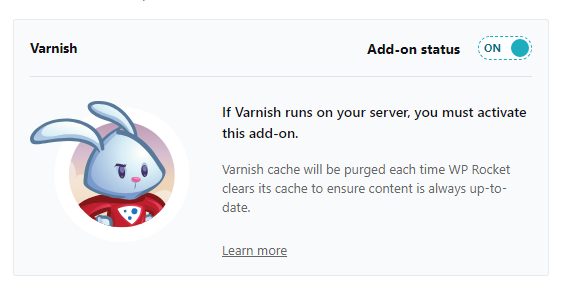
To enable Varnish, you need to enable this add-on, no further configuration needed.
WP-Rocket with Cloudflare
Cloudflare performs the minification process of JS and CSS. In contrast to WP-Rocket, the plugin involved an additional process called concatenation.
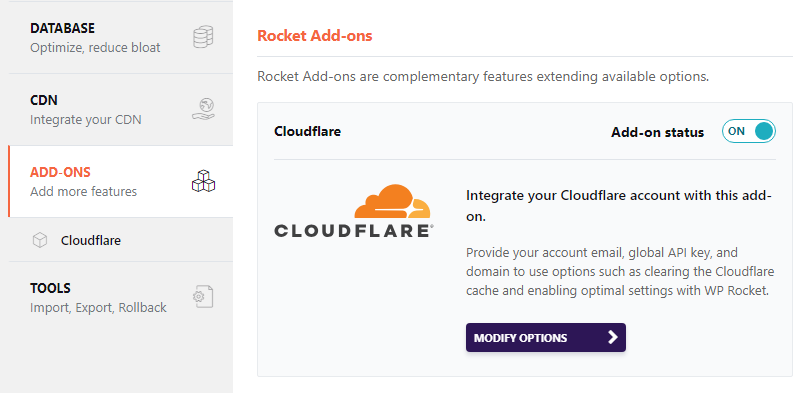
It means WP Rocket combines files into little groups for better compatibility and performance.
With the Rocket plugin, it is optional to use Cloudflare individually as the plugin involves WP Rocket Cloudflare add-on.
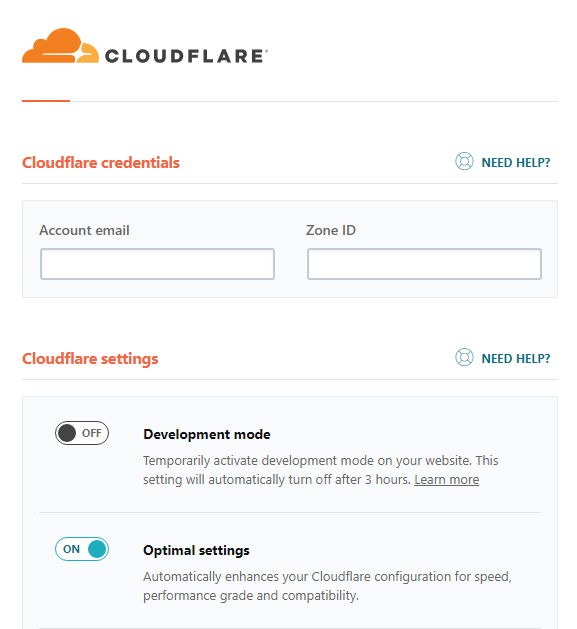
WP Rocket’s Cloudflare add-on
In the plugin’s add-on tab, you will see the Cloudflare add-on.
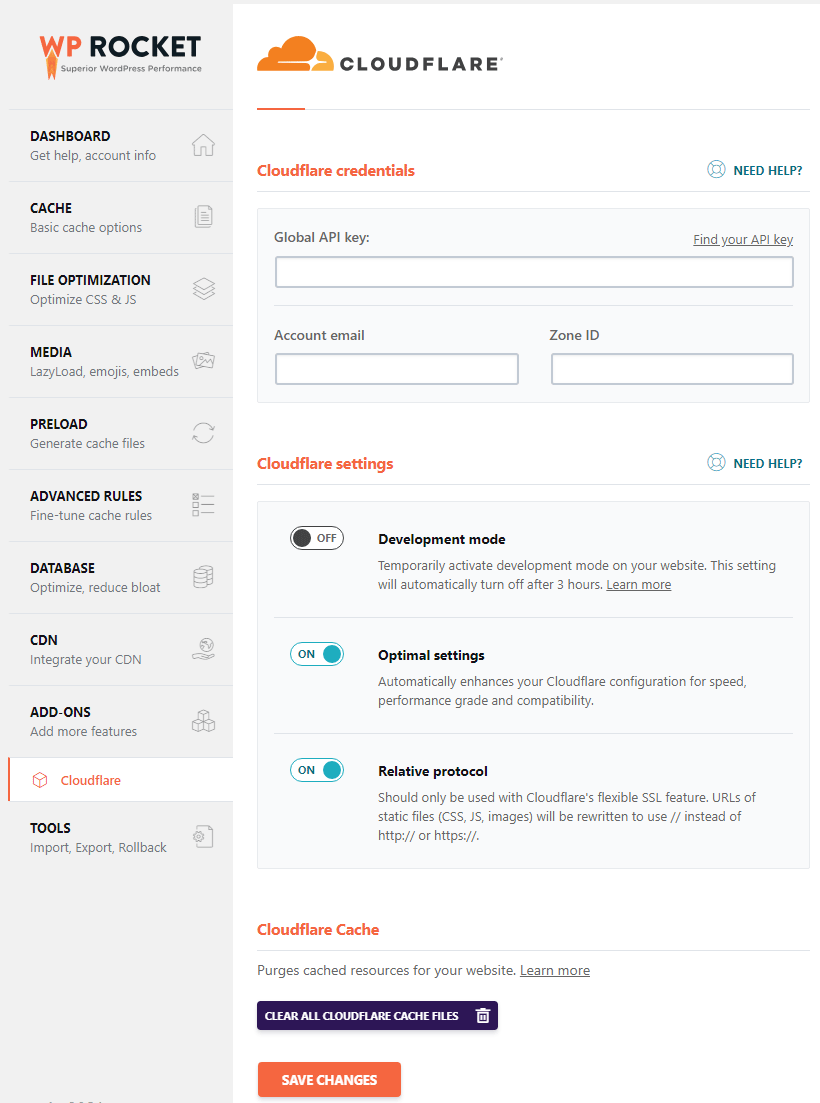
- Turn the button ON and click the Modify Options button. A new tab for Cloudflare settings will open.
- It will ask for the Global API key. For that, Log Into your Cloudflare account. You will get your Global API key there.
- Copy the Global API key and paste in WP Rocket settings.
- In the Account Email, enter your email address used on your Cloudflare account.
- Zone ID: Enter your zone ID for your domain. This is found on the Overview page of your Cloudflare account.
Jumping down, you will see 3 options as follows:
1. Development mode: Development Mode allows you to suspend Cloudflare’s edge caching and minification features temporarily.
2. Optimal settings: Activating this option is highly recommended. It will,
- Set Cloudflare’s caching level to Aggressive
- Activate Cloudflare’s minification
- Deactivate Rocket Loader (name unrelated to WP Rocket)
- Set Cloudflare’s browser cache to 1 month
3. Relative protocol: The Relative protocol setting rewrites the URLs of static files (CSS, JS, images) to use a relative protocol ( // instead of http:// or https://). You should NOT activate it when your WordPress site runs on full SSL. You should enable this only if you are using Cloudflare’s flexible SSL feature.
At the end of the page, you will see a button ‘Clear all Cloudflare cache files.’ It is highly recommended, do not use this button every time. It is only helpful while troubleshooting the problems.
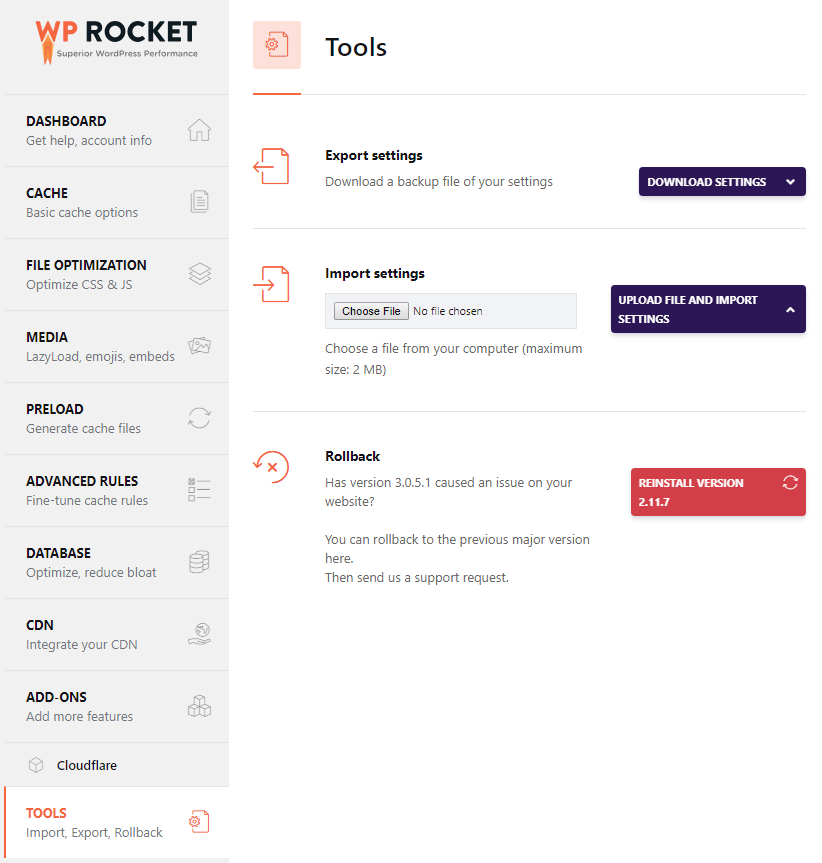
Tools
There is a list of some important tools like Importing or Exporting settings, Rollback, etc.
Conclusion
Hence, you are done with some simple settings of WP-Rocket.
Now, you have to check if the plugin is working or not. To do so,
- Log out of WordPress as you have enabled Caching for logged in users.
- Open your site and check the source code.
- Check the comment appearing as follows:
This website is like a Rocket, isn't it? Performance optimized by WP Rocket. Learn more: http://wp-rocket.meThe comment will not appear if you have enabled minification at Cloudflare’s end. Instead, you can see the links to the minified files in the header.
Bonus Tips
Enabling White Label footprint
Like other cache plugins, WP Rocket also adds a footprint in the HTML source code on your site, which looks like:

But, the WP-Rocket plugin allows the White label footprint. So, enabling a white label allows you to remove mention of WP Rocket in the HTML comment footprint on your site.
How to enable a White Label footprint?
- Edit
wp-config.phpat the root of your WordPress installation and add this constant:
define ('WP_ROCKET_WHITE_LABEL_FOOTPRINT', true);- Then clear the cache.
- The footprint will update to a generic message without mention of WP Rocket:

Hide Cloudflare’s API key fields
If you prefer to hide API key fields in the WP Rocket’s Cloudflare settings, then add the following code snippet to wp-config.php file.
define( 'WP_ROCKET_CF_API_KEY_HIDDEN', true );Adding this will hide the API key field in the settings.
You can also add API keys directly in wp-config.php
define('WP_ROCKET_CF_API_KEY', 'put-your-API-key-here');It is all about performance optimization. In particular, WP-Rocket helps its best as it claimed to optimize your site performance. You may like to read my other guide on speeding up WordPress.
Hi! Amit,
Thanks for well-organized information on the WP-Rocket plugin. I’ve used WP-Rocket on my website and it works well and improves overall website performance.
Many thanks!
Glad you find this guide helpful.
Wonderful Amit, you have clearly mentioned and defined each option very clearly in this article. I have followed every step very carefully from this wp-rocket tutorial and it effectively increased the speed of my website. As per the Gtmetrix, it is PageSpeed scores A(95%) and for YSlow it is B (87%)
TD speed booster plugin has compatibility issues and it takes the effort to fix most of the issues. I’m a non-tech guy that’s why relied on optimization plugins. But the mobile score doesn’t reach up to green signal. As WP Rocket is a paid plugin, how can I sure and believe that this plugin will solve my issues?
Yea, TD Speed booster plugin needs technical knowledge to configure.
WP Rocket comes with 15 days money back guarantee so if you are not happy with it you can ask full refund. I will be happy if you purchase it from my link 🙂
I have used almost every popular free cache plugin for my site. But can’t solve render blocking js and optimize css above the fold. Google scores 50-77 for Mobile everytime. Getting irritated after trying so much.
As I remember you’re using Newspaper theme, so you can use TD Speed booster plugin to remove render blocking scripts or try using WP Rocket plugin.