
You all might have received an update from WordPress that they will only promote hosting partners that provide an SSL certificate by default in their accounts. So, the whole world is moving their websites from HTTP to HTTPS.
Enabling an SSL makes all Non-secure HTTP requests to HTTPS. It’s not an easy task to edit all the links from all your articles. And most of the beginners face mixed content warning over the internet browser.
In the previous article, I have shared an easy guide to setup free universal SSL on a website or a blog. I hope you have already gone through it. After adding SSL to the existing blog or a website you might mop up Mixed Content Warnings.
So, in this guidepost, I am sharing some easy tips to fix the mixed content warning. It will not take more than 5-10 mins to fix it.
Before we start fixing mixed content warnings, let’s understand the basics of the Mixed content.

What is Mixed Content?
Mixed content occurs when initial HTML is loaded over a secure HTTPS connection. But some other resources such as images, videos, stylesheets, scripts being loaded over an insecure HTTP connection.
In short, the Mixed content warning occurs because of both HTTP and HTTPS content are being loaded to display the same page.
Fixing Mixed Content Warning
If I guess, you might be using Cloudflare to manage your DNS. Right??
Install the official Cloudflare WordPress plugin & activate it. Then Go to Settings > CloudFlare & configure the plugin. This plugin will auto fix the too many redirection loops.
You can also add page rule to redirect all website resources to the HTTPS. To do so all you need to add a page rule for the URL http://*yourdomain.com/*. Here we added ‘*’ at the beginning and the end as the beginning * tells to redirect all the subdomain directories and last * tell to redirect URL pattern.
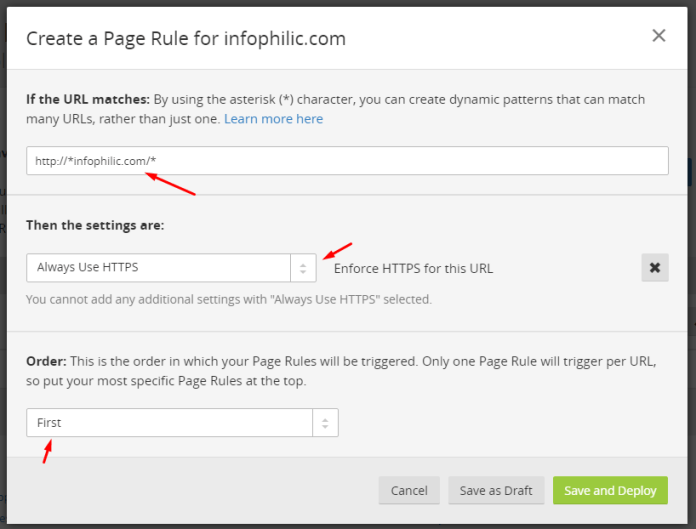
Then choose Always use HTTPS in the settings. Make sure this rule should be at the top of all other rules. So choose First in the order then Save and Deploy. Go to cache settings and purge all the cache. That’s it now your site URL is forcefully redirected to the HTTPS.
Cloudflare also provides a single button option for Automatic HTTPS Rewrites. It helps fix mixed content by changing “http” to “https” for all resources or links on your website that can be served with HTTPS.
HTTPS for WordPress Admin Panel
Now, you need to configure all these with complete migration. This means you are going to use HTTPS for your WordPress Admin Panel.
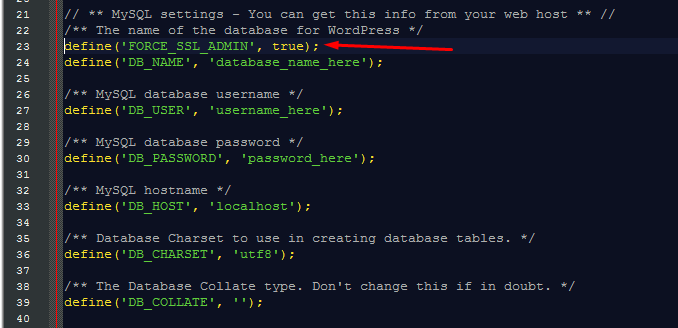
- To do this edit the WordPress “wp-config.php” file.
- For editing, Login to your Hosting using FTP.
- open the file & add command: define(‘FORCE_SSL_ADMIN’, true);. into code as shown in Image:
Change Website Address To HTTPS:
From the WordPress dashboard, go to Settings > General and change the WordPress Address & Site Address to HTTPS. shown in the image.

Adding Redirect using .htaccess
Non-Cloudflare users can add redirect using .htaccess file. Just add the following code to the .htaccess file on your server.
# HTTP to HTTPS
RewriteEngine On
RewriteCond %{HTTPS} off
RewriteRule (.*) https://%{HTTP_HOST}%{REQUEST_URI} [R=301,L]
Editing .htaccess file can break your site, so I recommend you to check our tutorial 3 Correct Ways to Edit .htaccess File.
Bonus Tips
- Add the “https” site in the Google Search Console & Bing Webmaster Tool.
- Submit your sitemap.
- Update all of your social profile links to point to the “https” site.
- Use the Broken Link Checker plugin to find redirected internal links & fix them with one click.
- Go to Google Analytics & update the site’s URL.
Hope you find this article helpful, please help us to grow by sharing our contents with your friends on your social networks.

Hey Amit,
Great write up, especially about using Cloudflare to automatically handle rewrites.
For anyone not using Cloudflare, or just looking to clean up their site before Cloudflare even gets to it, we have a couple tools to help track down mixed content.
Hope it's of use.